

- Minecraft Exit Code 1 error can occur due to outdated drivers, incompatible mods or issues with the files or relevant software.
- You can update the GPU drivers to fix it. Moreover, a certain troublesome mod can be causing it too.
- Changing the Java executable path or the Minecraft Launcher path may fix this error. You can also try reinstalling Java.
Like most gaming experiences, Minecraft is prone to its fair share of errors. One of the common errors Minecraft players face is Minecraft Exit Code 1. This pesky error crashes your game, ruining the entire experience. Want to learn how to fix this nuisance? Well, keep reading as I break it all down and show you how to fix the Minecraft Exit Code 1 error.
What Is the Minecraft Exit Code 1 Error?
Exit Code 1 is probably one of the most frustrating technical problems you may get in Minecraft. The Exit Code 1 error occurs when players try to launch the game. However, the error causes Minecraft to crash immediately on the desktop and throw up a text saying, “An unexpected issue has occurred. Please try restarting.” Do note that depending on the situation, the text might be different.
The Minecraft Exit Code 1 error can be caused by several potential issues. These include outdated drivers, incompatible mods, Java executable issues, and more. Thankfully, this error has many fixes, making it easy to solve. Let’s begin doing that now!
Easy Fixes for Minecraft Exit Code 1 Error
1. Update GPU Drivers
One of the first actions you can take to fix Exit Code 1 is to update your GPU drivers. Outdated drivers can cause issues that stop the game from functioning properly. Therefore, it’s always best if you keep them up to date.
The method you use will depend on your GPU. Visit the official websites and download updates for the specific graphics card you own, or update the drivers from the respective manufacturer’s software.
2. Remove Troublesome Mods
Minecraft mods are another reason the game might give the Exit Code 1 error. These third-party mods are usually added by players themselves and modify the game. If there is an issue with the mod, Minecraft simply won’t run properly or will crash.
These issues can imply that the mod is outdated, incompatible with your game version, or has an internal issue. What you can do is try to figure out which mod is troublesome. Begin by heading over to “%appdata%” and running this on your Windows Run command.
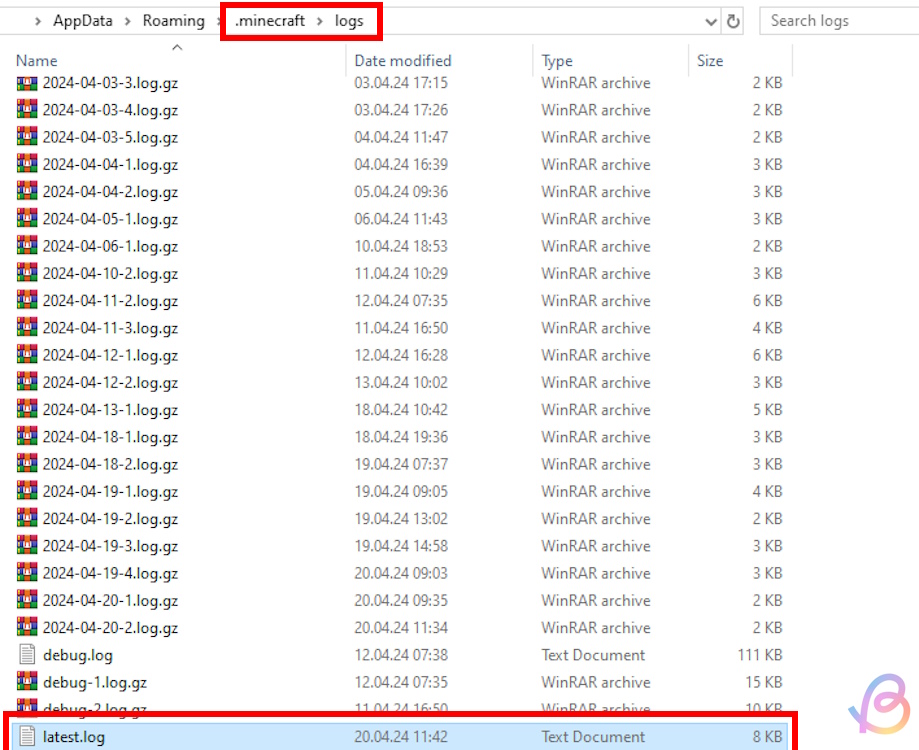
Remove one mod at a time to determine which one stops the game from loading. However, If you’ve got many mods, this might be a bit more tricky. You can check the latest.log text document in the “logs” folder inside the main .minecraft folder to see which mod might be a problem.
3. Change the Java Executable Path
Java is naturally essential for running the Minecraft Java edition. If it malfunctions, the game will also run into the Exit Code 1 Error. The first thing you can do is to check whether the Java executable path is viable. Follow the steps below to do so:
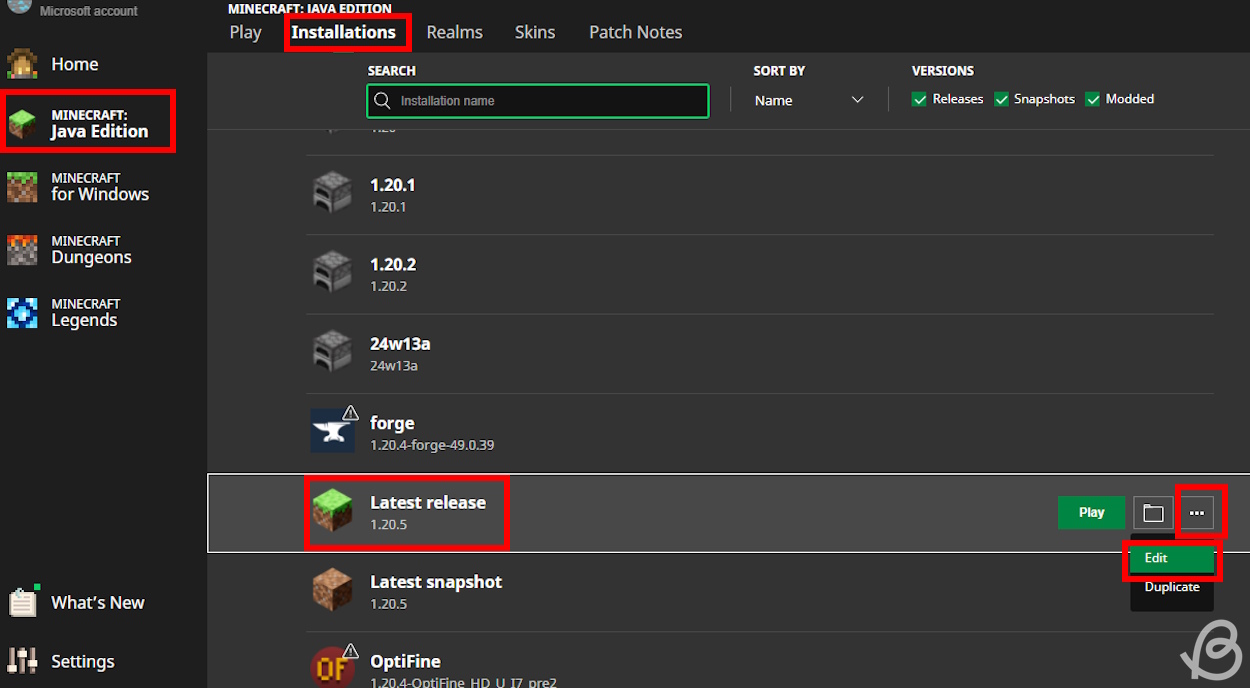
- Open the Minecraft Launcher and go to the game’s Java version.
- Click on the “Installations” button at the top.
- Now, find the Latest Release profile, hover over it, and click on the ellipsis menu (three dots). Now click the “Edit” button.
- This will open a new section where you can reveal more options at the bottom.
- Next to the Java Executable section, click on the “Browse” button.
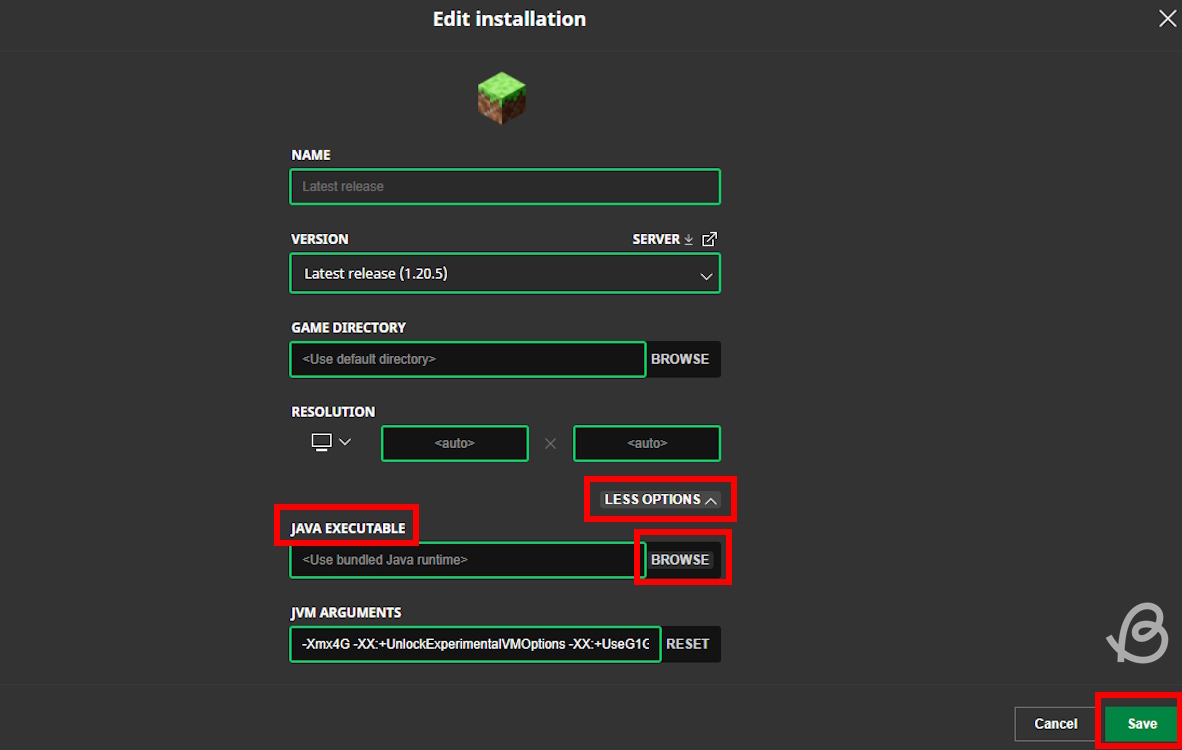
- Now, navigate to the Java installation folder. By default, it should be C:Program Files (x86)Javajre1(version number)bin.
- Select the java.exe file and click Open. If the Java application has an issue, the filename will be javaw.exe. Change it to java.exe to fix it.
- After you’re done, click on the “Save” button and restart the game to fix the Exit 1 Code error.
4. Reinstall Java
If the previous method doesn’t work, you can also try reinstalling Java. This process is fairly easy and quick and will remove all corrupted files. You’ll first need to delete the current Java version by uninstalling it in the Control Panel’s “Programs and Features” section.
Once done, visit the official Java website and download the correct version, depending on your operating system. Once done, simply install it like any other software, and you’re all done!
5. Change Minecraft Launcher Path
The final fix we have for you is for your Windows launcher path. Sometimes, an incorrect or odd Windows username can cause Minecraft to throw the Exit 1 Code error, making the entire process frustrating.
- Right-click on the Minecraft Launcher app icon on your desktop and click on Properties.
- In the Shortcut section, add the following line at the end of the Target field: “–workDir %ProgramData%.minecraft“
- Click on the “Apply” and “OK” buttons.
And that’s it! Changing the launcher path should successfully get rid of the error!
And that’s how you fix the Minecraft Exit Code 1 error. Sadly, sometimes there might be deeper and more serious issues with your PC that could be the cause. So, if none of the above methods help you out, you might need to check your PC components in order to see if they function properly.
We hope the error is now resolved for you. If you’re still having issues, drop your questions in the comments below!
 Sampad Banerjee
  Sampad Banerjee
  Sampad Banerjee
 Sanmay Chakrabarti
  Sampad Banerjee
  Sampad Banerjee
  Sampad Banerjee


